 日本語版 Twitter Blog で告知されていますが、去年の 8月に提供開始された Twitter API v1.1 への完全移行 (つまり、API v1.0 の提供終了) に伴い、旧版の Twitter ウィジェット、通称 「Join the conversation ウィジェット」 の提供が 2013年 3月 5日で終了します。
Blog などに設置している方は、今のうちに同様の機能を持った新版の 「埋め込みタイムライン」 に差し替えをしておきましょうということで、簡単に 「埋め込みタイムライン」 の設置方法についても触れてみたいと思います。
API v1.0からv1.1への移行に伴い、近いうちに "Join the conversation" の表示のあるTwitter公式ウィジェットが利用できなくなります。今後はサイト上に簡単にTwitterのタイムラインを表示できる「埋め込みタイムライン」をご利用ください。サーバーサイドでAPI 1.1を使って情報を習得して Display Requirements(英語)に従い、ウィジェットをご自分で作成いただくことも可能です。
Twitter API v1.1 って?
Twitter API v1.1 については下記の開発者向け Blog で去年の 8月に紹介されています。
詳しいドキュメント類 開発者向けのページにありますが、API の概要としては下記のような感じ。
で、v1.1 が発表されたときに、半年間は移行期間とし、v1.1 と平行して v1.0 も使えるようにするけど、その後 v1.0 の提供は終わるよって告知されていました。去年の 8月公開で半年後だと、今月中になるんですが、終了時期に関しては埋め込みタイムラインのドキュメント内に下記のように明記されてます。2013年 3月 5日で終了と。
The previous incarnation of Twitter widgets will be deprecated at the same time as API version 1.0 on March 5th, 2013.
埋め込みタイムラインの使い方
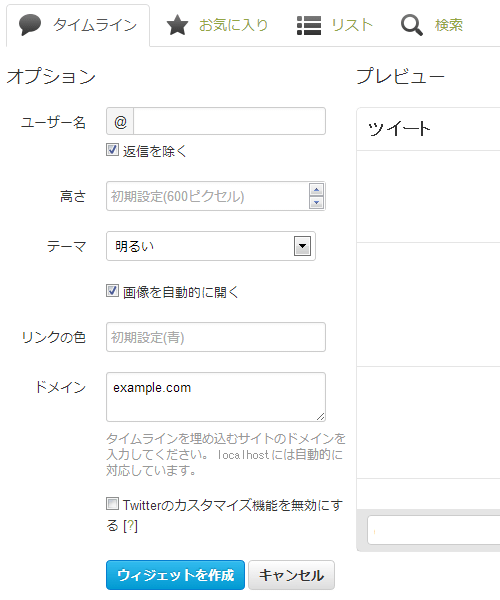
埋め込みタイムラインを使うには、Twitter サイトにログインした状態で、「設定 (Setting)」 内の 「ウィジェット (Widgets)」 ページに移動します。

そこに 「新規作成 (Create New)」 ボタンがあると思いますのでクリックするとウィジェットの作成画面に。

自分のタイムラインを埋め込みたいなら、上のタブから 「タイムライン (User timeline)」 を選択して必要な情報を入れて行きます。
- ユーザー名は最初から入ってると思うので自分のなら変える必要なし
- 高さは貼り付ける場所にあわせてお好みで
- テーマは明るい色か、暗い色かの 2択
- リンクカラーもお好みで
- ドメインにはウィジェットを貼り付けるページのドメインを例にならって入力。カンマで区切って複数指定可能。貼り付ける可能性があるドメインを全部入れとけばいい。
あとは 「ウィジェットを作成 (Create widget)」 ボタンを押せば、下記のような貼り付け用のソースコードが出力されます。
<a class="twitter-timeline" href="https://twitter.com/username" data-widget-id="000000">@username からのツイート</a>
<script>!function(d,s,id){var js,fjs=d.getElementsByTagName(s)[0];if(!d.getElementById(id)){js=d.createElement(s);js.id=id;js.src="//platform.twitter.com/widgets.js";fjs.parentNode.insertBefore(js,fjs);}}(document,"script","twitter-wjs");</script>
で、ウィジェットを貼り付けたいところにコピペすればいいんですが、JavaScript 部分
<script>!function(d,s,id){var js,fjs=d.getElementsByTagName(s)[0];if(!d.getElementById(id)){js=d.createElement(s);js.id=id;js.src="//platform.twitter.com/widgets.js";fjs.parentNode.insertBefore(js,fjs);}}(document,"script","twitter-wjs");</script>
に関しては、Twitter ボタンとかと共通で、1ページ内に 1つ記述があれば OK なので、ページの </body> 直前とかにまとめてもいいかもしれません。1ページ内に複数のウィジェットを設置する場合も同じ。
詳しいドキュメントは下記にありますが、
ウィジェットのデフォルトサイズは 520px × 600px。横幅は可変で最小値が 220px。最大値は 520px。高さの最小値は 350px になりますので、最低でも表示する領域には 横 220px × 縦 350px 必要ということになります。
その他、オプション設定もページに貼り付けるソースコード上で指定可能。
- Theme: Set by adding a data-theme="dark" attribute to the embed code.
- Link color: Theme: Set by adding a data-link-color="#cc0000" attribute.
- Width: Set using the standard HTML width attribute on the embed code (units are pixels.)
- Height: Set using the standard HTML height attribute on the embed code (units are pixels.)
- Language: The widget language is detected from the page, based on the HTML "lang" attribute of your content. You can also set the HTML "lang" attribute on the embed code itself.
- Web Intent Related Users: As per the Tweet and follow buttons, you may provide a comma-separated list of user screen names as suggested followers to a user after they reply, Retweet, or favorite a Tweet in the timeline. Use a data-related="benward,endform" attribute on the embed code.
- ARIA politeness: ARIA is an accessibility system that aids people using assistive technology interacting with dynamic web content. Read more about ARIA on W3C's website. By default, the embedded timeline uses the least obtrusive setting: aria-polite="polite". If you're using an embedded timeline as a primary source of content on your page, you may wish to override this to the "assertive" setting, using data-aria-polite="assertive".
実際にオプション指定を付与した例。a要素に width / height 属性とかなんだよクソが (おっと失礼) とは思いますが。
<a class="twitter-timeline" href="https://twitter.com/twitterapi" data-widget-id="YOUR-WIDGET-ID-HERE" data-theme="dark" data-link-color="#cc0000" data-related="twitterapi,twitter" data-aria-polite="assertive" width="300" height="500" lang="EN">Tweets by @twitterapi</a>
なお、これら設定が埋め込まれたソースコードに付与されている場合は、Twitter 側でウィジェット作成の時に設定した内容を上書きします。また、この埋め込みウィジェットの表示回数は、API のレート制限対象にはなりません。
ということで、差し替えはお早めに。


