たまたま X (Twitter) で目にした CSS (下記のポスト) が個人的に 「へぇ頭いいな~」 と思ったので、自分でも試してみようと簡単にデモページを作ってみましたというお話。
<table> highlighting with CSS :has()
td:has(~ td:hover), /* previous sibling cells */
table:has(td:nth-of-type(3):hover) /* column cells */
tr:not(:first-of-type):has(~ tr:hover)
td:nth-of-type(3) {
background: var(--highlighted);
}
— jhey (@jh3yy) February 5, 2025
要するに、表組み (table) のセルにマウスオーバーしたときに、そのセルが属する行と列の背景色を変えることで、縦軸、横軸を参照しやすくするっていうアイデアですね。
:has() 疑似クラスを使う方法で、ソースコードをみれば特に難しいことはしていないんですけども、こうすればできるってことに気がつくのが素晴らしいなと思いました。
デモページとソースコード
実際に動作するデモページと全体のソースコードは GitHub で公開していますので、下記のリンクからご確認いただければ。
何をやっているのか
まず今回使用する HTML は下記のような感じです。
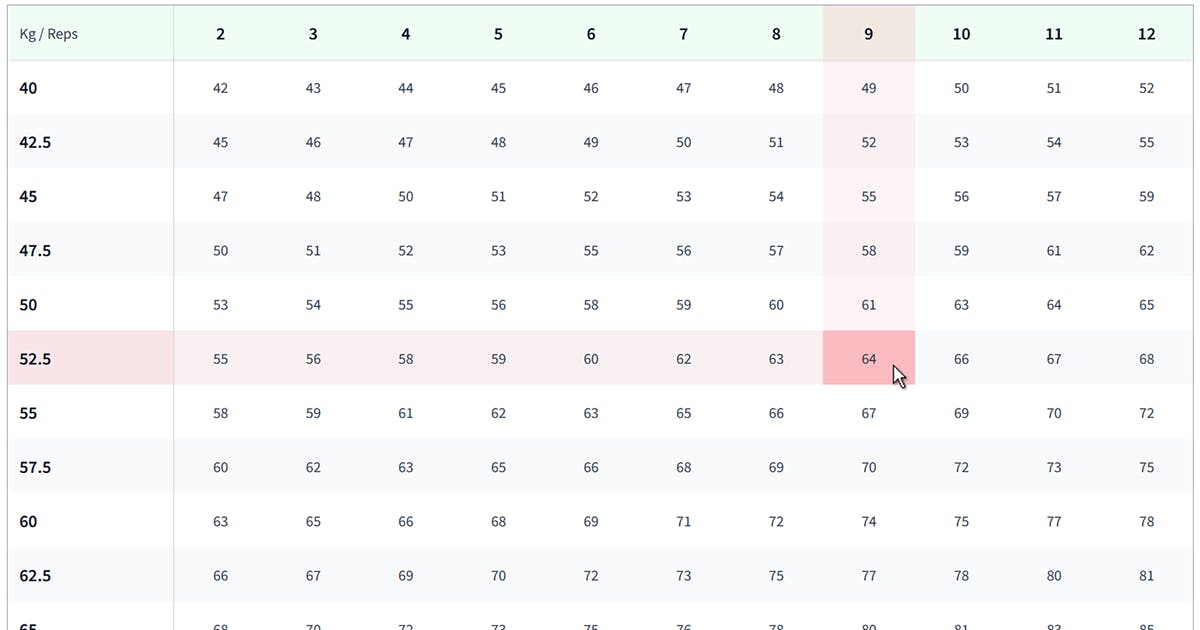
表組みの中身に特に意味はありません。縦軸・横軸の確認が便利に感じるとしたら、構造は単純だけどセルの数が多い場合かなということで、筋トレする人にはおなじみの 「RM 換算表」 を使ってみました。
<table lang="en">
  <caption>Repetition Maximum Conversion Table (One Repetition Maximum Conversion)</caption>
  <thead>
    <tr>
      <td>kg / Reps</td>
      <th scope="col">2</th>
      <th scope="col">3</th>
      <th scope="col">4</th>
      <th scope="col">5</th>
      <th scope="col">6</th>
      <th scope="col">7</th>
      <th scope="col">8</th>
      <th scope="col">9</th>
      <th scope="col">10</th>
      <th scope="col">11</th>
      <th scope="col">12</th>
    </tr>
  </thead>
  <tbody>
    <tr>
      <th scope="row">40</th>
      <td>42</td>
      <td>43</td>
      <td>44</td>
      <td>45</td>
      <td>46</td>
      <td>47</td>
      <td>48</td>
      <td>49</td>
      <td>50</td>
      <td>51</td>
      <td>52</td>
    </tr>

    <!-- ...省略... -->

  </tbody>
</table>
ちなみに、今回は最初に提示した X のポストにあった CSS に手を加えて、セル内の要素にフォーカスが当たった場合にも同じようにハイライトが動作するようにしています。
ただ、デモで用意した表組みは、セル内にフォーカスできる要素を入れていないので、例えばリンクやボタンなど、フォーカスできる要素をセル内に入れてもらえれば、実際の動作が確認できると思います。
CSS 部分の解説
さて、CSS は表組みの見た目に関する部分はとりあえず無視して、ハイライト表示に関係する部分だけ抜粋してみましょう。
まずは、以下の処理をしている部分について。
- 自分自身が
:hoverされたり、子要素にフォーカスが当たった状態 (:focus-withinした状態) の時に、セルの背景色を変える :hover、あるいは:focus-withinされたセルからみて、左方向にあるセル (兄弟要素) の背景色を変える (要するに横軸の可視化):hover、あるいは:focus-withinされたセルからみて、行方向の見出しセル (th 要素) の背景色を変える (これも横軸の可視化)
各宣言ブロックがそれぞれ何をしているかはコメントとして記述してあります。
:root {
  --color-red-500: oklch(.637 .237 25.331);
}

tbody {
  td {
    /* 任意の td 要素が :hover されている状態 */
    &:hover {
      background-color: color-mix(in oklab, var(--color-red-500) 30%, transparent);
    }
    /* 任意の td 要素の子要素が :focus されている = :focus-within している状態 */
    &:focus-within {
      background-color: color-mix(in oklab, var(--color-red-500) 30%, transparent);
    }
    /*
      :hover された td 要素からみて、左方向の兄弟 td 要素に背景色を指定
      言い方を変えると、:hover された td 要素に先行する兄弟関係(同一の親要素を持つ)の td 要素を探している
    */
    &:has(~ td:hover) {
      background-color: color-mix(in oklab, var(--color-red-500) 5%, transparent);
    }
    /* :focus-within された td 要素からみて、左方向の兄弟 td 要素に背景色を指定 */
    &:has(~ td:focus-within) {
      background-color: color-mix(in oklab, var(--color-red-500) 5%, transparent);
    }
  }

  tr {
    /* :hover された td 要素からみて、行方向の見出しセル (th 要素) に背景色を指定 */
    &:has(td:hover) th {
      background-color: color-mix(in oklab, var(--color-red-500) 10%, transparent);
    }
    /* :focus-within された td 要素からみて、行方向の見出しセル (th 要素) に背景色を指定 */
    &:has(td:focus-within) th {
      background-color: color-mix(in oklab, var(--color-red-500) 10%, transparent);
    }
  }
}
ここまでで、:hover、あるいは :focus-within されたセルと、そのセルから見た行方向のセルに関して背景色が指定され、横軸の可視化までは完了したということですね。
では残る縦軸 (列方向) の可視化をどうするか。これはちょっと面倒くさいというか、正直、ソースコード的にあまり美しくはないです。
ソースコードが見にくくなるので、一旦、:hover された場合に関する部分だけ下記に記載します。
/* :hover された td 要素からみて、列方向の見出しセル (th 要素) に背景色を指定 */
table:has(tbody td:nth-of-type(1):hover) thead tr th:nth-of-type(1),
table:has(tbody td:nth-of-type(2):hover) thead tr th:nth-of-type(2),
table:has(tbody td:nth-of-type(3):hover) thead tr th:nth-of-type(3),
table:has(tbody td:nth-of-type(4):hover) thead tr th:nth-of-type(4),
table:has(tbody td:nth-of-type(5):hover) thead tr th:nth-of-type(5),
table:has(tbody td:nth-of-type(6):hover) thead tr th:nth-of-type(6),
table:has(tbody td:nth-of-type(7):hover) thead tr th:nth-of-type(7),
table:has(tbody td:nth-of-type(8):hover) thead tr th:nth-of-type(8),
table:has(tbody td:nth-of-type(9):hover) thead tr th:nth-of-type(9),
table:has(tbody td:nth-of-type(10):hover) thead tr th:nth-of-type(10),
table:has(tbody td:nth-of-type(11):hover) thead tr th:nth-of-type(11),
table:has(tbody td:nth-of-type(12):hover) thead tr th:nth-of-type(12) {
  background-color: color-mix(in oklab, var(--color-red-500) 10%, transparent);
}

/*
  :hover された td 要素からみて、上方向に位置する td 要素に背景色を指定
  言い方を変えると、:hover された td 要素を含む tr 要素に先行する tr 要素内で、同じ位置に出現する td 要素を探している
*/
tbody:has(td:nth-of-type(1):hover) tr:has(~ tr:hover) td:nth-of-type(1),
tbody:has(td:nth-of-type(2):hover) tr:has(~ tr:hover) td:nth-of-type(2),
tbody:has(td:nth-of-type(3):hover) tr:has(~ tr:hover) td:nth-of-type(3),
tbody:has(td:nth-of-type(4):hover) tr:has(~ tr:hover) td:nth-of-type(4),
tbody:has(td:nth-of-type(5):hover) tr:has(~ tr:hover) td:nth-of-type(5),
tbody:has(td:nth-of-type(6):hover) tr:has(~ tr:hover) td:nth-of-type(6),
tbody:has(td:nth-of-type(7):hover) tr:has(~ tr:hover) td:nth-of-type(7),
tbody:has(td:nth-of-type(8):hover) tr:has(~ tr:hover) td:nth-of-type(8),
tbody:has(td:nth-of-type(9):hover) tr:has(~ tr:hover) td:nth-of-type(9),
tbody:has(td:nth-of-type(10):hover) tr:has(~ tr:hover) td:nth-of-type(10),
tbody:has(td:nth-of-type(11):hover) tr:has(~ tr:hover) td:nth-of-type(11),
tbody:has(td:nth-of-type(12):hover) tr:has(~ tr:hover) td:nth-of-type(12) {
  background-color: color-mix(in oklab, var(--color-red-500) 5%, transparent);
}
言ってることわかりますかね......
最初に、:hover された td 要素からみて、列方向の見出しセル (th 要素) に背景色を指定している部分の中から、下記のセレクタを分解して解説していくと、
table:has(tbody td:nth-of-type(1):hover) thead tr th:nth-of-type(1)
まず、下記の部分で、tbody td:nth-of-type(1) に該当する要素が :hover された状態を子要素にもつ table を探しますね。
table:has(tbody td:nth-of-type(1):hover)
そうしたら、次の部分、上記の条件にマッチした table 内で、thead tr th:nth-of-type(1) にマッチする th を探し出せば、それが :hover された td 要素の列方向の見出しセルということになります。
thead tr th:nth-of-type(1)
次に、:hover された td 要素からみて、上方向に位置する td 要素に背景色を指定している部分の中から、下記のセレクタを分解して解説していくと、
tbody:has(td:nth-of-type(1):hover) tr:has(~ tr:hover) td:nth-of-type(1)
まず、下記の部分で、td:nth-of-type(1) に該当する要素が :hover された状態を子要素にもつ tbody を探します。
tbody:has(td:nth-of-type(1):hover)
続けて、上記の条件にマッチした tbody 内で、:hover された tr を後続兄弟にもつ tr を探し出すと、一旦、:hover された td 要素を含む行 (tr 要素) より前に存在する行がすべて選択されます。
tr:has(~ tr:hover)
あとは、:hover された td 要素を含む行より前に存在する行の中から、:hover された td 要素と同じ位置、つまり、:hover されたのが、tr 要素内で 1 番目に記述された td 要素であれば、各行で同じ 1 番目に記述された td 要素を探し出してあげれば、縦軸が表示できると。
td:nth-of-type(1)
この説明で伝わってますかね。言葉で説明するのは結構難しい。
フォーカス時の記述も加えると、下記のような感じになります。
table:has(tbody td:nth-of-type(1):hover) thead tr th:nth-of-type(1),
table:has(tbody td:nth-of-type(2):hover) thead tr th:nth-of-type(2),
table:has(tbody td:nth-of-type(3):hover) thead tr th:nth-of-type(3),
table:has(tbody td:nth-of-type(4):hover) thead tr th:nth-of-type(4),
table:has(tbody td:nth-of-type(5):hover) thead tr th:nth-of-type(5),
table:has(tbody td:nth-of-type(6):hover) thead tr th:nth-of-type(6),
table:has(tbody td:nth-of-type(7):hover) thead tr th:nth-of-type(7),
table:has(tbody td:nth-of-type(8):hover) thead tr th:nth-of-type(8),
table:has(tbody td:nth-of-type(9):hover) thead tr th:nth-of-type(9),
table:has(tbody td:nth-of-type(10):hover) thead tr th:nth-of-type(10),
table:has(tbody td:nth-of-type(11):hover) thead tr th:nth-of-type(11),
table:has(tbody td:nth-of-type(12):hover) thead tr th:nth-of-type(12),
table:has(tbody td:nth-of-type(1):focus-within) thead tr th:nth-of-type(1),
table:has(tbody td:nth-of-type(2):focus-within) thead tr th:nth-of-type(2),
table:has(tbody td:nth-of-type(3):focus-within) thead tr th:nth-of-type(3),
table:has(tbody td:nth-of-type(4):focus-within) thead tr th:nth-of-type(4),
table:has(tbody td:nth-of-type(5):focus-within) thead tr th:nth-of-type(5),
table:has(tbody td:nth-of-type(6):focus-within) thead tr th:nth-of-type(6),
table:has(tbody td:nth-of-type(7):focus-within) thead tr th:nth-of-type(7),
table:has(tbody td:nth-of-type(8):focus-within) thead tr th:nth-of-type(8),
table:has(tbody td:nth-of-type(9):focus-within) thead tr th:nth-of-type(9),
table:has(tbody td:nth-of-type(10):focus-within) thead tr th:nth-of-type(10),
table:has(tbody td:nth-of-type(11):focus-within) thead tr th:nth-of-type(11),
table:has(tbody td:nth-of-type(12):focus-within) thead tr th:nth-of-type(12) {
  background-color: color-mix(in oklab, var(--color-red-500) 10%, transparent);
}

tbody:has(td:nth-of-type(1):hover) tr:has(~ tr:hover) td:nth-of-type(1),
tbody:has(td:nth-of-type(2):hover) tr:has(~ tr:hover) td:nth-of-type(2),
tbody:has(td:nth-of-type(3):hover) tr:has(~ tr:hover) td:nth-of-type(3),
tbody:has(td:nth-of-type(4):hover) tr:has(~ tr:hover) td:nth-of-type(4),
tbody:has(td:nth-of-type(5):hover) tr:has(~ tr:hover) td:nth-of-type(5),
tbody:has(td:nth-of-type(6):hover) tr:has(~ tr:hover) td:nth-of-type(6),
tbody:has(td:nth-of-type(7):hover) tr:has(~ tr:hover) td:nth-of-type(7),
tbody:has(td:nth-of-type(8):hover) tr:has(~ tr:hover) td:nth-of-type(8),
tbody:has(td:nth-of-type(9):hover) tr:has(~ tr:hover) td:nth-of-type(9),
tbody:has(td:nth-of-type(10):hover) tr:has(~ tr:hover) td:nth-of-type(10),
tbody:has(td:nth-of-type(11):hover) tr:has(~ tr:hover) td:nth-of-type(11),
tbody:has(td:nth-of-type(12):hover) tr:has(~ tr:hover) td:nth-of-type(12),
tbody:has(td:nth-of-type(1):focus-within) tr:has(~ tr:focus-within) td:nth-of-type(1),
tbody:has(td:nth-of-type(2):focus-within) tr:has(~ tr:focus-within) td:nth-of-type(2),
tbody:has(td:nth-of-type(3):focus-within) tr:has(~ tr:focus-within) td:nth-of-type(3),
tbody:has(td:nth-of-type(4):focus-within) tr:has(~ tr:focus-within) td:nth-of-type(4),
tbody:has(td:nth-of-type(5):focus-within) tr:has(~ tr:focus-within) td:nth-of-type(5),
tbody:has(td:nth-of-type(6):focus-within) tr:has(~ tr:focus-within) td:nth-of-type(6),
tbody:has(td:nth-of-type(7):focus-within) tr:has(~ tr:focus-within) td:nth-of-type(7),
tbody:has(td:nth-of-type(8):focus-within) tr:has(~ tr:focus-within) td:nth-of-type(8),
tbody:has(td:nth-of-type(9):focus-within) tr:has(~ tr:focus-within) td:nth-of-type(9),
tbody:has(td:nth-of-type(10):focus-within) tr:has(~ tr:focus-within) td:nth-of-type(10),
tbody:has(td:nth-of-type(11):focus-within) tr:has(~ tr:focus-within) td:nth-of-type(11),
tbody:has(td:nth-of-type(12):focus-within) tr:has(~ tr:focus-within) td:nth-of-type(12) {
  background-color: color-mix(in oklab, var(--color-red-500) 5%, transparent);
}
お気づきになった方もいると思いますが、縦軸方向のハイライトを実現するためには、表組みがもっている列の数に合わせて CSS を書かないといけないことがわかります。手書きだと面倒くさいですね。
Sass などを使っているのであれば、下記のように @for でぶん回せば簡単かもしれません。
@for $i from 1 through 12 {
  table:has(tbody td:nth-of-type(#{$i}):hover) thead tr th:nth-of-type(#{$i}),
  table:has(tbody td:nth-of-type(#{$i}):focus-within) thead tr th:nth-of-type(#{$i}) {
    background-color: color-mix(in oklab, var(--color-red-500) 10%, transparent);
  }

  tbody:has(td:nth-of-type(#{$i}):hover) tr:has(~ tr:hover) td:nth-of-type(#{$i}),
  tbody:has(td:nth-of-type(#{$i}):focus-within) tr:has(~ tr:focus-within) td:nth-of-type(#{$i}) {
    background-color: color-mix(in oklab, var(--color-red-500) 5%, transparent);
  }
}
ちなみに、今回書いたサンプルの CSS は、同じくサンプルで使用している表組みの構造 (例えば thead や tbody 要素の使い方、行や列の数など) に依存する形で書かれています。
つまり、表組みの構造を大きく変えると、CSS もそれに合わせて書き換えないといけませんので注意してください。それから、セルの結合なんかがされていたりするとうまく行かないので、冒頭に書いたとおり、表組み自体は単純だけど、ちょっとデカくて行や列方向の見出しセルとの関係性がわかりにくい、みたいな場合にのみ有効かなと思います。
おまけ
実はこのアイデアを最初に見かけた時、ハイライトのラインがクロス (十字) の形になってよければ、縦軸方向のハイライトは col 要素でもっとスマートにいけるんじゃね? とか思ったんですけども、実際に考えてみたらそんなにスマートじゃなかったので諦めました。
あ、いや、書けないというか
```
table:has(td:nth-of-type(1):hover) col:nth-of-type(2) {
background: var(--highlighted);
}
```みたいな書き方で無理やりはいけるんだけどあまりよくない
— Yoshiki Kato (@burnworks) February 6, 2025